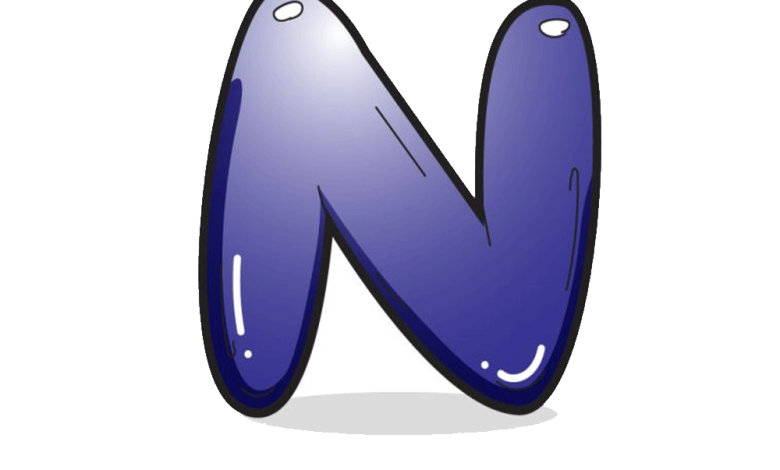
Instructions to Draw An Air pocket Letter N
The letter N is the fourteenth letter of the letters in order and the case is totally different. This can make figuring out how to compose these letters a piece challenging for the people who are simply figuring out how to compose the letters in order. In any case, it is one of the simplest letters to compose once you become acclimated to it. While it probably won’t be that hard to compose a capital N, it can get more convoluted if you need to figure out how to draw a capital N. After reading this blog and visit the pinkie pie drawing.
At the point when you figure out how to draw an air pocket letter, you can make a wide range of fun drawings. We make sense of how you can undoubtedly do this in only 6 stages! So, how about we start with the initial step of the aide. We then, at that point, give you some extra thoughts for you to attempt.
Step by step instructions to Draw An Air pocket Letter N
Stage 1
Before you start with this air pocket, you can make it simpler on yourself by first drawing it as an ordinary N. This should be possible generally with a pencil. Assuming that you conclude to do this, you ought to utilize a light-hued pencil or press delicately to the side so the pencil lines can be handily deleted later. Whether or not you go for a customary N or not, we can begin with the primary line. You can utilize any drawing device, yet we suggest something with a thick nib.
You should simply draw a straight, corner to corner line. The reference picture shows you the point it ought to be at.
A large portion of the lines in this plan won’t be completely straight as we need to make the letter seem as though it’s made from an air pocket. Nonetheless, this line will be a special case. We actually suggest drawing it freehand as opposed to utilizing a ruler, yet attempt to make it as straight as could really be expected.
Whenever this is done we can continue on toward the following stage where we will add what you began.
Stage 2
Then, we should expand the principal line you attracted to the following segment of this N. As you can find in our model, this line is drawn from above where the past one finished. The highest point of this first line bends up and afterward down, practically like a thrill ride. So it will go down a lot, however there will in any case be a slight bend.
At the foundation of the new line, it will bend in somewhat as we begin drawing the foundation of the N. Rectifying this line can be troublesome, so attempt to move toward it gradually and equitably. Likewise, follow the reference picture cautiously as it will assist you with tracking down the right point and bend. Then, at that point, we go on with the plan in sync 3!
Stage 3
The third pass of your letter N bubble centers around the lower part of the letter. This part can be a piece interesting, so we should move slowly. Steps like this show you why it tends to be so useful to draw an ordinary N first, as it makes imagining the finished result such a great deal more straightforward! In the first place, we start precisely where the line finished previously. It will bend and lump upwards as displayed in the model picture.
This line closes generally in the center of the letter, finishing at a sharp point there. At long last, from this sharp point, you want to define one more descending slanting boundary. That implies you’re prepared to finish the last subtleties of the example in the subsequent stage of the aide. So assuming that you are prepared, we can continue on toward this part.
Stage 4
As referenced in the past step, this will finish the diagram for the letter prior to adding some final details in the subsequent stage of the aide. To do this, we attract the columnar segment on the right half of the letter. The present moment there is a hole on the right that we will fill. This implies you can decide to begin this next area on the top or base line.
However you go, we’ll draw a long, bended shape that beginnings and closures where the lines recently finished.
As you can find in the reference picture, it is a similar level as the support point on the left. That implies you’re finished with the side dish! Prior to continuing with the last contacts, make certain to eradicate any pencil lines you utilized as an aide. In the event that you’ve defined the last boundaries in ink, ensure it’s totally dry prior to deleting anything.
Stage 5
You’ve done the hardest pieces of this letter and presently we can unwind and partake in a few last subtleties.
These subtleties look straightforward however have a major effect in the drawing. The principal objective of these subtleties is to give the feeling that this letter comprises of an air pocket. We’ll begin this interaction by making the air pocket letter appear as though it’s mirroring light. To do this, simply draw too little ovals on the letters.
In our model we set them at the highest point of the letter, yet you can put them anyplace you like. Next we believe that the letter should have some profundity and volume. We accomplish this by defining different somewhat bended boundaries over the letters. This will assist with making the letter look puffy. We’ll show you where we set these lines. Be that as it may, you can draw them somewhere else if you have any desire to alter them. Once these have been drawn you can add your information! It very well may be shapes, designs or other little subtleties that make your letter N more one of a kind. At the point when you’re prepared, how about we continue on toward the last step and colorize your picture.
Stage 6
Presently you’re prepared for the last step of this aide, which is adding a variety to your air pocket letter N. Here you can truly have a great time and get innovative. So we urge you to trial and see what occurs! To begin with, we’ll involve our model as a reason for how you can variety it. We utilized a more obscure blue variety plot yet additionally utilized some variety varieties. By making the varieties lighter in certain areas than others, you can cause the letters to show up as though light is gleaming on them. Our model shows how we figured out how to do this.
We think this variety combo looks perfect, however there’s compelling reason need to stay with it. You can pick some other variety you like and you could try and need to integrate a wide range of varieties! Whenever you’ve concluded how you need to variety it, go ahead and play with creative instruments and media also. There are such countless ways of having a good time whenever you’re finished with this drawing. Release your imagination and see what you can make!
Your Air pocket Letter N Drawing is Done!
Also Read bulls diaplay